=

Welcome to 1200stitches!
Stitch by stitch I love to create...and this blog tells the tales of my sewing adventures! With links to 1200stitches.etsy.com, you can buy handmade goodies for the home, yourself or the little ones in your life, and at boodybabiesbedding.etsy.com, you can create the nursery or toddler room of your dreams!

Wednesday, December 14, 2011

New Sewing Room!!!


For all you crafters out there, this is my new dream sewing/creative space! I went from a 6'x8' hallway to this! My amazing husband framed it out, installed the drop ceiling, hung the drywall laid the floor and installed all my cabinets (that I put together) to create this wonderful space. I think he thought I was CRAZY when I picked out the colors, but I couldn't be happier and I think even he agrees that it turned out AMAZING!

We started with a bare basement room....


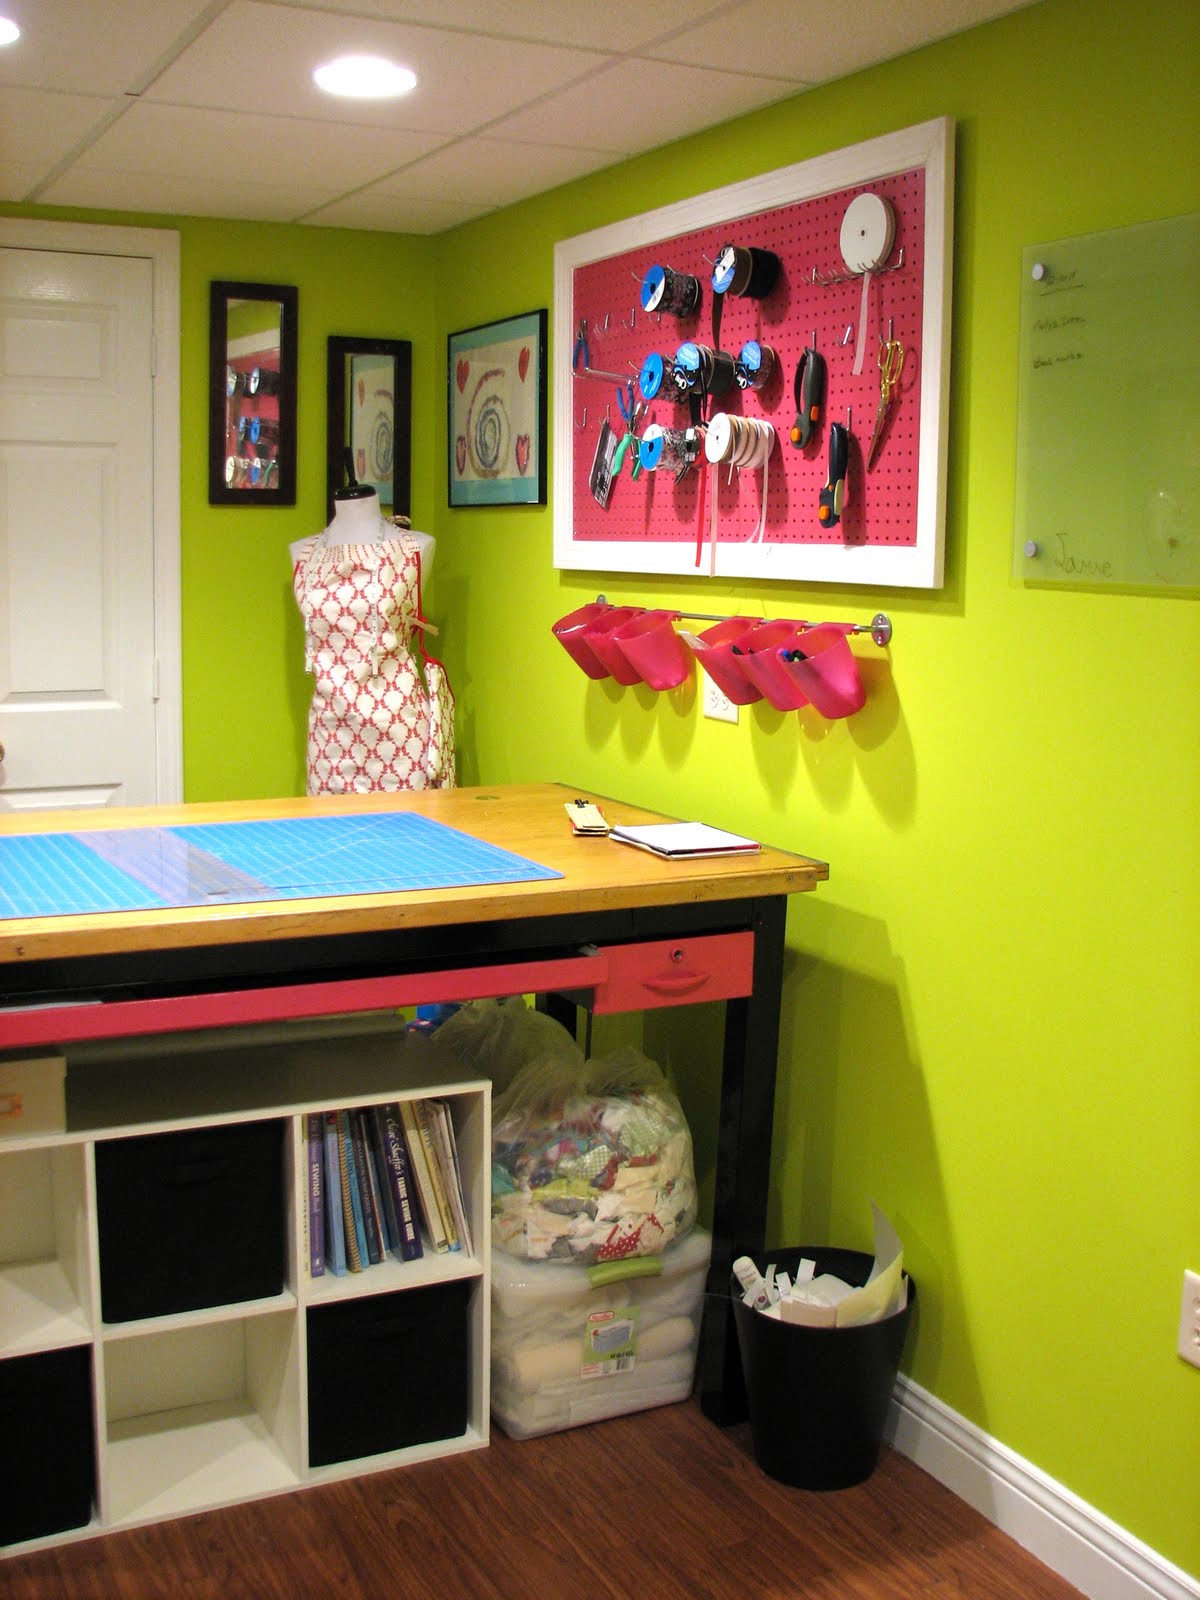
I wanted something bold and fun and stimulating and inspiring....and I think I found it...actually I came home with dozens of paint samples before I finally settled on Zany Lime by Dutch Boy. I added black and fuschia accents to the room (I was wanting to work in a fun blue or aqua but just ran out of space). The flooring is roll out, no glue, textured vinyl that helps give the cheap vinyl (on sale for 49¢ a squre foot) a warm, not-so-cheap feel. Lighting was key...I needed lots of light to so I could color match and coordinate pretty acurately and I needed indirect light so that I could work closely to my items without too much of a shadow. There are 7 can lights (5 floods and 2 spots over the table) that create a very well lit work space.
I have a place for everything and everything in it's place...contemporary bookshelves with glass doors from Ikea house my fabric stash as well as some of my ready-to-buy items. A 5 drawer bank supports the countertop where my sewing machines live and serves as excellent storage for all of my sewing machine accessories, extra scissors, fasteners, etc. etc. etc. I repainted my husband's old drafting table black with fuschia accents; it makes an AMAZING cutting table and work space. I wanted a colorful pegboard to hang all the goodies I'd need at the the table and my husband took it up a notch by framing it out in white casing.
Under the table I added inexpensive cube storage for current projects and backburner projects. On the otherside, I added inexpensive shoe racks by closet maid to hold the bolts of interfacings and such.
All in all, I am extremely proud of the room we created and have been working in it for a couple weeks now...


Friday, June 24, 2011

Finally!!!

At long last my cathedral window quilt is done...along with several coordinating nursery pieces. I LOVE, LOVE, LOVE this quilt! I think it's my favorite piece that I have created to date. It started with an idea of using bright, modern fabrics for a traditional style cathedral window quilt...I thought it would be such a fun nursery piece! But...this project was back-burnered so many times I really have no idea how long I've actually worked on it...and it's changed. I originally was going to make crib bumpers with the cathedral window panels, but I decided it would go farther for whoever purchases it as a quilt than as bumpers(especially with the work involved).
I started with plain white Kona cotton...I love Kona...and then I cut small squares of Amy Butler, Michael Miller Ta Dots, Patty Young's dandelions, I think there is a Riley Blake print in there...and then I randomly put it together. I also created an adjustable height crib skirt to coordinate as well as three fitted crib sheets, fabric flag buntings and a functional baby blanket as the cathedral window quilt is too heavy for a baby (but would work well for a toddler or pre-schooler) and would be better used as room decor.
Without further ado, please enjoy...


Friday, June 10, 2011

Pink and Green Dream!

I am so excited to share this latest project I completed!!! I was recently approached by a customer who was interested in having a ruffle valance made for her daughter's bedroom. She picked out several super cute fabrics and I went to work...she eventually added three coordinating throw pillows and a bed skirt...then she decided she would like a coordinating duvet cover and pillow sham. This was my second go at a duvet cover, my first at a large piecework project, and I am beyond thrilled at how it came together. My customer has an incredible eye for color and pulled together some really sweet prints and she was kind enough to share these pictures of the room all put together. Tell me this isn't just absolutely precious!!


I have been slowly chipping away at a cathedral window crib quilt and coordinates that I hope to have listed in my bedding shop by the end of the month...I'll post pictures when it's all set.

Monday, May 2, 2011

Happy Birthday!

My husband's grandmother turned 100 years old last month!!! I was tasked with planning the party and decorating the card/display table. Soooo....I made an absolutely adorable birthday banner (the pictures aren't super adorable, but you get the idea). They would also make a great, personalized baby gift or kid gift.
Check these out...


Saturday, April 23, 2011

My latest projects!

I've been pretty busy...and I created a new style of dress that I hope to roll out in my shop within the next couple of months. It's entirely new and probably not super original, but it is SUPER cute! It is a mock-smocked/shirred sundress...very simple, in style and to make...but I punched it up a notch by adding tired ruffles to the base!


I also did a coordinating skirt...these are actually coordinating cousin outfits...


...and check out the latest custom crib bedding set! I was approached by a customer who had been looking for this set that had been discontinued. She had been able to get sheets and few other room coordinates, but needed me to create the bumper, skirt, blanket and pillows. We used a set of the toddler bedding to incorporate fabrics from the commercial crib set and then I added linen solids to finish it off. I am really pleased with how it came out.

Tuesday, March 22, 2011

What a cutie!

Check out this little cutie! I couldn't resist creating one of these fabulous ruffle skirts for my little girl! I appliqued some little flowers on a matching t-shirt.


Wednesday, February 23, 2011

Pretty Princess in Pink


I just made this SUPER cute skirt and matching shirt! I have been dying to make a ruffle skirt since I began making the ruffle valances. I plan to make several more...I think my little girl needs one, too.

Tuesday, February 15, 2011

Machine

This post is a tribute to my machines...I use three different sewing machines for different reasons. I know it's a little excessive and probably a little bit unnecessary, but....My first sewing machine was a Janome 5700. My husband gave it to me for Christmas because years before I had mentioned that I wanted to learn to sew so that when we had children I could make their Halloween costumes. It's a great machine...a plethora of stitches and also an embroidery machine. Then I started sewing and selling on Etsy and using heavier fabrics and stitching through more and more layers. I decided it was time to get a workhorse that could take all that so that I didn't tear up the "fancy" machine. I bought myself a used Juki TL 98 E. It's a bare bones machine...one straight stitch and reverse. It does have an automatic cutter that I love. One of my machines was acting up so I took it in...in the meantime, I decided to borrow my grandma's machine. She used to sew quite a bit...making clothes for my mom and aunts and then for my sister and me. She has Kenmore from the 1950's and it is a blast to work with. It only has about 5 stitches, which at the time was a pretty big deal. What I love it for is the attachments....a binder, a ruffler, a gather foot....a few others that I haven't even tried yet. I know I could get those feet for my existing machines, but it's so much more fun to sew on the machine that created some of the cutest Easter dresses I wore.
I recently used all three for one project! The ruffler attachment on the Kenmore was used to ruffle the tiers for the latest ruffle valance I made. Then I use the Juki to stitch the tiers together and then the overlock stitch on the Janome finishes all the edges.


Saturday, February 5, 2011

First Post

First post! I thought I would kick off this blog by posting about a recent creation that I absolutely LOVE! This is a ruffle valance that tiers a multi-colored stripe over a tone-on-tone hot pink with tulle under neath and a third layer of aqua blue-on-blue polka dot. As soon as I get caught up on my custom orders, my plan is to turn this concept into a skirt for my little girl. I also created three piped throw pillows and an applique name pillow. Enjoy...