

Sunday, December 1, 2013
CYBERMONDAY15
Monday, November 25, 2013
Thanksgiving!
As we head into Turkey Day, I have finished up a few last minute projects that I wanted to have listed before the big shopping begins…these cute little aprons and a super cute skirt…I have two more projects that I hope to get completed and listed tomorrow.
Come Wednesday, let the baking begin!!! This year my contribution to the family feast is going to be a cranberry relish a friend found at foodnetwork.com…this relish features fresh cranberries, apples, oranges, pineapple and Grand Marnier! I will also be making a pumpkin cake roll courtesy of wilton.com, and a good old fashioned apple pie. (click the live links for the cranberry relish and pumpkin roll recipes).
Have a Happy Thanksgiving!
Tuesday, November 19, 2013
New Listing!
New Listing! Today I made this cute little marker roll. I have a nice sized piece of this fabric left, so it may have be turned into a cute little apron/oven mitt set or maybe a skirt set with one of the dolls appliqued onto the shirt? Hmm…decisions, decisions.
Monday, November 11, 2013
Ruffles and Lace and Owls, Oh My!


Saturday, November 2, 2013
What a week!
This past week has been CRAZY busy!! We celebrated my son's 6th birthday, trick or treated, had classroom parties and still had our usual running around…karate, gymnastics, volleyball, after school art classes. I had fully intended to post a little something and the week slipped away. Sewing this week was fairly light…some utility pieces for a regular customer and a simple, straight panel crib skirt for a new customer. The coming week brings two ruffle valances and a crib set (with bumper and skirt). I'm also slated to create an applique tree crib blanket which I am really excited to make…I'll be sure to share the results. So for now, enjoy my very delicious albeit somewhat sloppy, whipped cream frosting interpretation of the Death Star from the original Star Wars series. Have a great week!
Monday, October 21, 2013
Back to Basics
It began with buttons...learning to sew a button was the first sewing task I learned, waaayyy back when it was actually interesting. Now, sewing buttons is a task I loath...probably because the end product is so very minimal...that satisfaction of completing a project is almost non-existant. However, sometimes going back to basics is necessary. With both of my kids in school, it's time to step up this little hobby I have been playing with for the past few years (or rejoin the work force !@#^@!)...which means sitting down and writing a plan? ...a business plan? Maybe not, but laying out some clear goals and a specific timeline is something that needs to get done...has been done and one of those goals was reaching out...putting to use this blog I created quite a while ago and then left by the wayside...this poor neglected blog that was supposed to catalogue my creations, chronicle my process...entertain?...
So, I begin....again...horrible grammar and all! I'm not making any promises...but...I need to get organized, I need to reign in my creative process, dial down my crafting ADD, find focus...so this is where I will start. Hopefully, with proper grammar employed (because the disconnected stream of thoughts flowing through this post will soon annoy me and voices of English teachers past will haunt my dreams), I can share this journey. So it's starting with buttons...my husband needs buttons sewn on his work shirts, something he jokingly asks if I could arrange via some Etsy seamstress because it generally takes months to get it done when he goes through me. He should be pleasantly surprised when he returns from work to find not one shirt done, but two!
Wednesday, December 14, 2011
New Sewing Room!!!

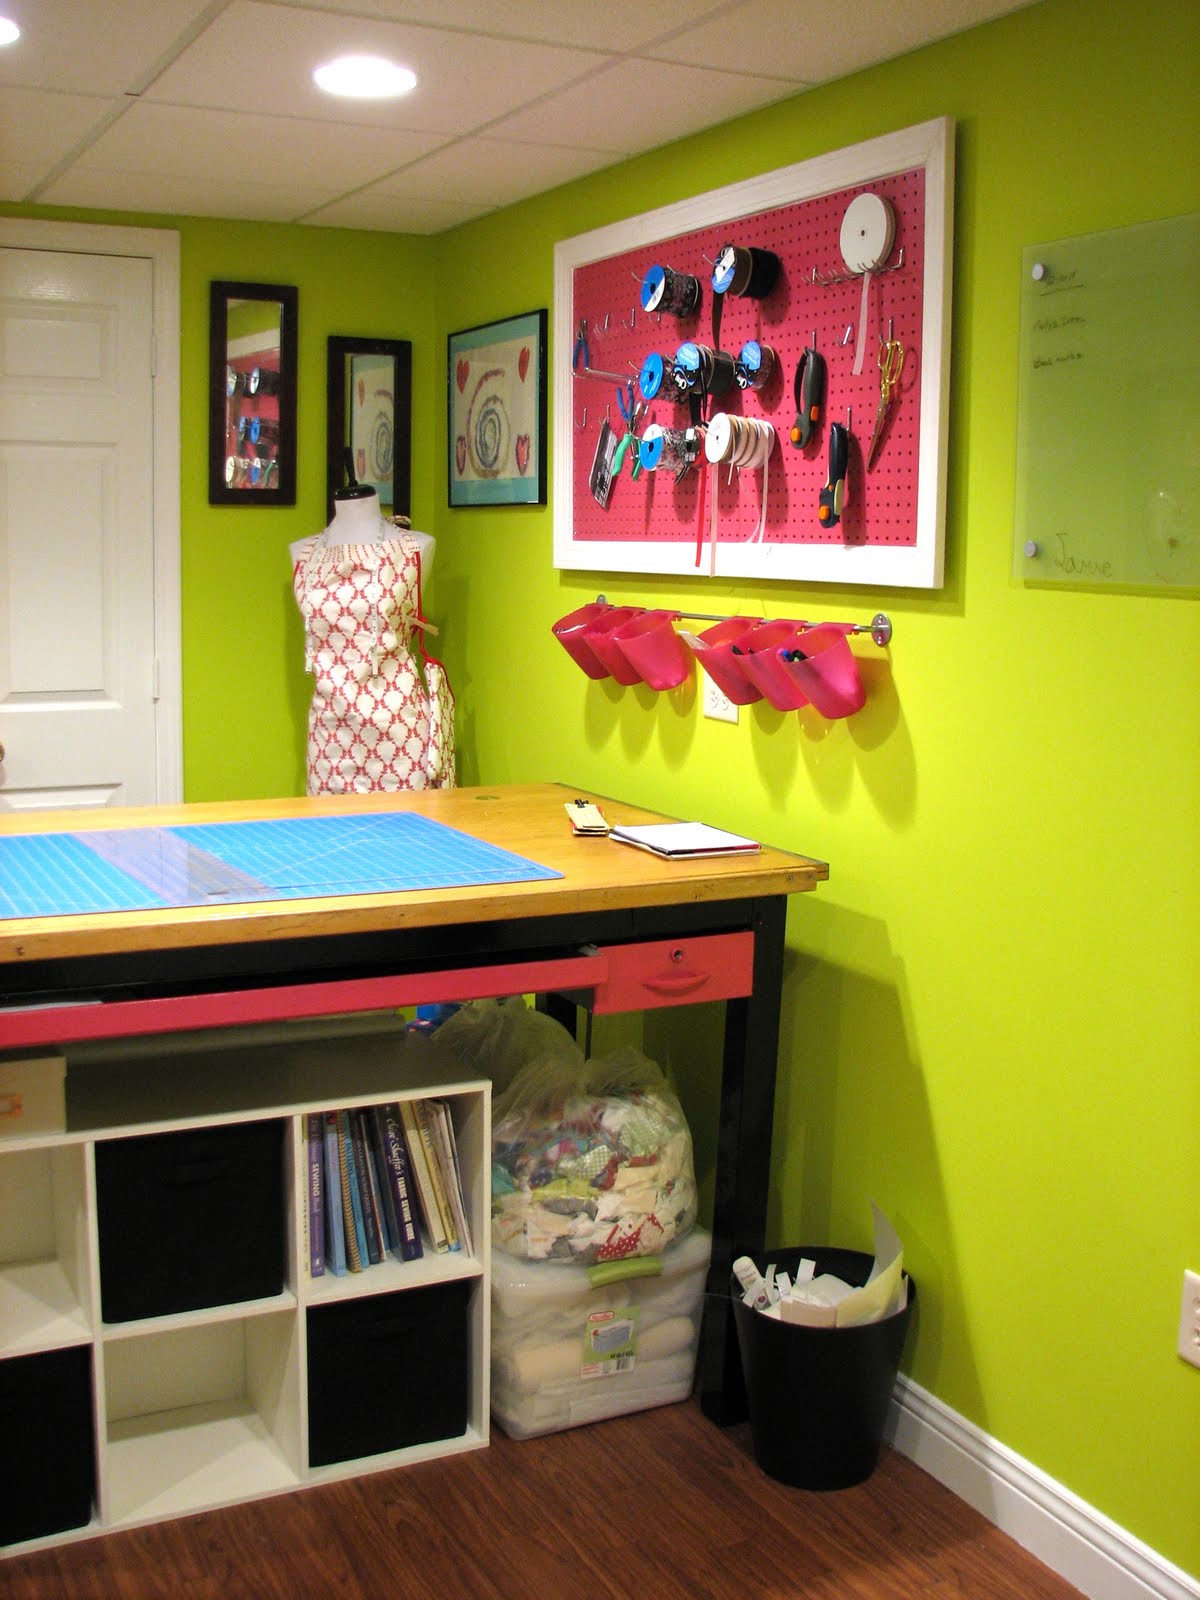
For all you crafters out there, this is my new dream sewing/creative space! I went from a 6'x8' hallway to this! My amazing husband framed it out, installed the drop ceiling, hung the drywall laid the floor and installed all my cabinets (that I put together) to create this wonderful space. I think he thought I was CRAZY when I picked out the colors, but I couldn't be happier and I think even he agrees that it turned out AMAZING!
We started with a bare basement room....


I wanted something bold and fun and stimulating and inspiring....and I think I found it...actually I came home with dozens of paint samples before I finally settled on Zany Lime by Dutch Boy. I added black and fuschia accents to the room (I was wanting to work in a fun blue or aqua but just ran out of space). The flooring is roll out, no glue, textured vinyl that helps give the cheap vinyl (on sale for 49¢ a squre foot) a warm, not-so-cheap feel. Lighting was key...I needed lots of light to so I could color match and coordinate pretty acurately and I needed indirect light so that I could work closely to my items without too much of a shadow. There are 7 can lights (5 floods and 2 spots over the table) that create a very well lit work space.
I have a place for everything and everything in it's place...contemporary bookshelves with glass doors from Ikea house my fabric stash as well as some of my ready-to-buy items. A 5 drawer bank supports the countertop where my sewing machines live and serves as excellent storage for all of my sewing machine accessories, extra scissors, fasteners, etc. etc. etc. I repainted my husband's old drafting table black with fuschia accents; it makes an AMAZING cutting table and work space. I wanted a colorful pegboard to hang all the goodies I'd need at the the table and my husband took it up a notch by framing it out in white casing.
Under the table I added inexpensive cube storage for current projects and backburner projects. On the otherside, I added inexpensive shoe racks by closet maid to hold the bolts of interfacings and such.
All in all, I am extremely proud of the room we created and have been working in it for a couple weeks now...


Subscribe to:
Posts (Atom)